
After years of whispered worries, missed workouts, and learning to read my body like a fragile map, something changed: small, steady practices that felt safe began to add up.
The mornings of bracing and holding loosened into afternoons where movement felt trusted again. This article gathers those steady tools — gentle, evidence-informed exercises and practical rituals — written like the calm voice you wish you’d had on a hard day.
Disclaimer: This article provides general information and gentle guidance, not medical advice. If you have pelvic pain, have undergone recent surgery, pregnancy, or any serious medical condition, check with a qualified healthcare provider before starting any new exercise program.

Why Pelvic Floor Stabilization Matters
Pelvic floor muscles are the quiet scaffolding beneath movement, emotion, and daily life. They support organs, affect bladder and bowel function, and help stabilize the pelvis during walking, lifting, and bending.
When these muscles are weak, tight, or uncoordinated, everyday tasks become heavy with micro-anxiety: sneezing becomes a calculation, laughing is guarded, and full social participation can feel risky.
This is not about perfection. Stabilization is about safety, trust, and small, repeatable practices that restore function and reduce fear. The goal is calm competence — muscles that respond when needed, relax when asked, and work with the rest of the body rather than against it.
Foundational Principles
Breathe First, Engage Second
Coordinating breath with pelvic floor action is the single most powerful stabilizing habit. Inhale to create space, exhale to gently recruit the pelvic floor.
Short Contractions, Long Holds, And Eccentric Control
Pelvic muscle training should include quick taps (fast contractions), sustained holds (endurance), and controlled lengthening during activity.
Integrate With Movement
Train the pelvic floor not just lying down, but while standing, walking, and lifting. Contextual stability transfers better to daily life.
Neutral Spine And Hip Awareness
Pelvic function is tightly linked to spinal posture and hip mobility. Minor adjustments to alignment can change how the pelvic floor fires.
Progress Slowly
Start with easier positions and increase challenge by changing posture, breathing, or adding load. Tiny progressions lead to lasting change.
Quick Safety Checklist Before You Start
- No sharp pain while exercising.
- No increased pressure or heavy bearing-down feeling.
- Urine or stool leakage that worsens should be checked by a clinician.
- If you are pregnant, postpartum (especially within 6–12 weeks), post-surgery, or have a prolapse, consult your healthcare provider first.
The Core Exercises
Pelvic Floor Awareness Breath
Purpose: Reconnect breath with pelvic floor movement and reduce guarding.
How To:
- Lie on your back or sit comfortably with hands on lower ribs.
- Inhale through the nose, feel ribs and belly soften.
- Exhale through pursed lips while visualizing a gentle lift from the pubic bone toward the tailbone — a soft drawing in.
- Repeat 8–10 breaths, resting between sets.
Tips:
- Keep the lift gentle; think of closing a small zip rather than clenching a fist.
- Pair with a soft sigh exhale to release tension.
Gentle Pelvic Floor “Taps” (Quick Contractions)
Purpose: Train fast-twitch response for sudden increases in pressure (cough, sneeze, jump).
How To:
- Sit or lie with neutral pelvis.
- Imagine stopping the flow of urine; perform a quick squeeze and release.
- Hold the squeeze for one second, then release fully.
- Do 10–15 taps, rest, repeat 2–3 times.
Tips:
- These should feel short and crisp, not long or breath-holding.
- Avoid clenching glutes, thighs, or jaw.
Sustained Lifts (Endurance Holds)
Purpose: Improve longer-duration support needed for standing, walking, and carrying.
How To:
- Lie on your back with knees bent or sit upright.
- Breathe in to prepare. Exhale and gently lift the pelvic floor, holding for a count that feels challenging but manageable (start with 5–10 seconds).
- Fully release for the same amount of time. Repeat 5 times.
Progression:
- Add a slow march or arm movement once 10-second holds are comfortable.
- Work up to repeated holds across the day (e.g., 3–4 sets).
Eccentric Release Drills
Purpose: Train controlled lengthening of pelvic floor after contraction, which reduces bearing-down sensations and improves coordination.
How To:
- From a firm but gentle lift, slowly let the muscles lengthen over 4–6 seconds while maintaining abdominal engagement and breathing.
- Repeat 6–8 times.
Tips:
- Imagine lowering a soft balloon rather than dropping a heavy weight.
- Coordinate with inhalation as the muscles release.
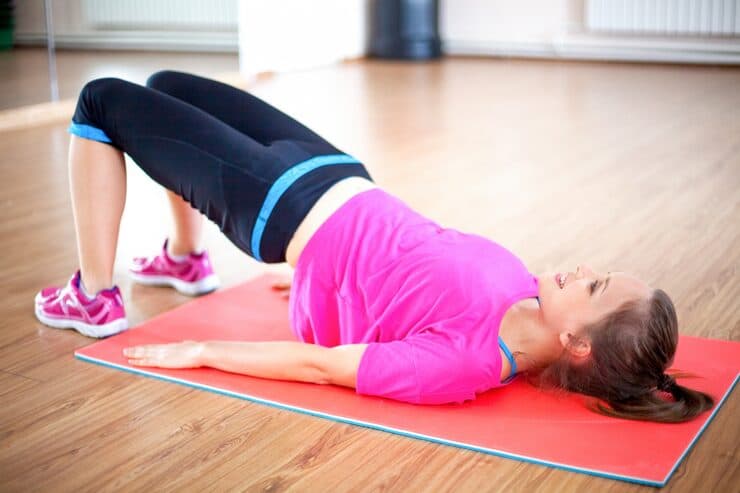
Bridge With Pelvic Floor Integration
Purpose: Integrate pelvic floor with posterior chain and hip stabilization.
How To:
- Lie on your back with knees bent, feet hip-width apart.
- Inhale to prepare. Exhale and gently lift pelvic floor, then tilt pelvis and lift into a bridge.
- Hold the bridge briefly (3–5 seconds) while maintaining a gentle pelvic floor lift, then lower with control.
- Repeat 8–12 times.
Progression:
- Add single-leg bridge once stable.
Heel Slides With Breath
Purpose: Combine pelvic floor activation with gentle hip mobility and diaphragmatic breath.
How To:
- Lie on your back with knees bent.
- Inhale, feel belly expand. Exhale and perform a small pelvic floor lift while sliding one heel away and back.
- Alternate sides for 10–12 each.
Tips:
- Keep movement small and smooth.
- Pause if you feel pressure downwards.
Standing Squeeze With Functional Tasks
Purpose: Apply pelvic floor engagement to everyday movements.
How To:
- While standing and breathing normally, perform a gentle pelvic floor lift.
- Combine with a functional task (e.g., lifting a pot, picking up a child, stepping onto a curb).
- Practice frequently: during teeth brushing, waiting in line, or walking.
Tips:
- Maintain natural breath.
- The lift should be supportive, not forceful.

Diaphragm-Pelvic Floor Coordination Drill
Purpose: Improve co-contraction patterns for improved intra-abdominal pressure control.
How To:
- Sit tall. Place hands on lower ribs.
- Inhale deeply, feeling ribs expand.
- On exhale, perform a gentle pelvic floor lift and lightly draw lower abdomen inward.
- Repeat 8–10 times.
Tips:
- Think of breath as the rhythm that orchestrates the pelvic floor, not the enemy.
Mobility And Complementary Practices
Hip And Glute Mobility
Tight hips can force pelvic floor compensation. Gentle hip openers and glute activation preserve healthy mechanics.
Examples:
- Supine figure-4 stretch.
- Quadruped hip circles.
- Clamshells with very light resistance.
Core Integrity, Not “Crunch” Focus
Strong and cooperative abdominal muscles support the pelvic floor. Favor anti-extension and anti-rotation movements over repetitive crunches.
Examples:
- Dead bug with pelvic floor lift.
- Pallof press variations.
- Bird dog with gentle pelvic floor engagement.
Posture And Pelvic Position Awareness
Small changes in standing and sitting alignment change how the pelvic floor fires. Aim for neutral pelvis — not tucking or over-arching.
Practice:
- Wall-lean alignment checks.
- Pelvic tilts with diaphragmatic breathing.
A Simple Weekly Practice Plan (Minimalist)
Frequency: Daily micro-practice plus 3 focused sessions per week.
Daily (5–10 minutes):
- Pelvic Floor Awareness Breath (2 minutes)
- 10 Quick Taps spaced throughout day
- 1–2 Sustained Lifts (5–10s each) during a functional task
Focused Session (15–25 minutes, 3× week):
- Warm-up breathing and hip mobility
- 3 sets of 10 quick taps
- 3 sets of 5 sustained lifts (progress duration over time)
- 8–12 bridges with pelvic floor integration
- 8–12 eccentric release drills
- 5 minutes of cooldown breathing and gentle stretches
Remember: less is more if it’s consistent.
Progressions And Variations
Make It Harder By:
- Increasing hold time gradually.
- Moving from supine to seated to standing.
- Adding gentle external load (light kettlebell or grocery carry) once stable.
Make It Easier By:
- Reducing hold time and number of repetitions.
- Practicing in supported positions (lying down) until coordination improves.
- Shortening sessions and increasing daily frequency.
How To Know It’s Working
Signs of improvement:
- Reduced urgency and fewer leaks with quick movements.
- Movement feels less guarded or fearful.
- Less pelvic heaviness at the end of the day.
- Greater confidence returning to walking, lifting, or exercise.
Keep a short symptom journal — three quick lines each day — to notice trends.
Common Mistakes And How To Fix Them
Over-Bracing The Whole Body
Fix: Focus on local pelvic floor lift with normal breathing. Relax jaw, shoulders, and glutes.
Thinking Strength Only, Not Coordination
Fix: Include quick taps, holds, and eccentric releases to build responsiveness.
Pushing Through Pain Or Pressure Downward
Fix: Back off and consult a pelvic health specialist. Pain and a bearing-down sensation are red flags.
Training Only Lying Down
Fix: Progress to standing and functional tasks to ensure carryover.
Holding Breath During Exercises
Fix: Anchor each movement to rhythmic, continuous breathing.
Table: Exercises At A Glance
| Exercise | Muscles Targeted | Difficulty | Reps / Duration | Key Tip |
|---|---|---|---|---|
| Pelvic Floor Awareness Breath | Diaphragm + Pelvic Floor | Very Easy | 8–10 breaths | Breathe soft, imagine a gentle lift |
| Quick Taps (Fast Contractions) | Pelvic Floor Fast Fibers | Easy | 10–15 taps | Short, crisp squeezes |
| Sustained Lifts (Holds) | Pelvic Floor Endurance | Moderate | 5–10s holds ×5 | Full release between holds |
| Eccentric Release Drills | Pelvic Floor Coordination | Moderate | 6–8 reps | Slow lengthening over 4–6s |
| Bridge With Integration | Glutes + Pelvic Floor | Moderate | 8–12 reps | Maintain gentle lift during bridge |
| Heel Slides With Breath | Pelvic Floor + Hip Flexors | Easy | 10–12 each side | Small, controlled slides |
| Standing Squeeze With Tasks | Functional Support | Variable | Integrate during daily tasks | Keep breathing, small lift |
Micro-Tools, Scripts, And Prompts
30-Second Grounding Script To Use Before Any Practice
Place one hand on your belly, one hand on your chest. Breathe in for 4, out for 6. Whisper to yourself: “Safe to move. Small and steady.” Do two cycles, then begin your practice.
Quick “Before A Sneeze” Script
Breathe in, set a tiny pelvic floor tap on the exhale, lean forward slightly, then exhale through pursed lips. Think: “Lift, support, release.”
Pocket Checklist For Daily Practice
- Breathe 10 mindful breaths.
- Do 10 quick taps.
- 1 set of 3 sustained lifts (as tolerated).
- Perform one functional squeeze during a daily task.
Reassuring Reframes To Use When Fear Arises
- “This is about small gains, not instant fixes.”
- “If it hurts, I pause and I learn.”
- “My body remembers when I practice gentle trust.”
Integrating With Life: Practical Tips
When Brushing Teeth
Plant feet hip-width. Do 10 quick pelvic floor taps.
While Waiting In Line
Practice diaphragmatic breath and one sustained lift.
Before Lifting A Child Or Heavy Object
Set breath, small pelvic lift, hinge with hips, lift with legs.
During Exercise Class
Cue your pelvic support before jumps or heavy core work. Use the quick tap as a protective pre-sneeze habit.
Emotional Work That Supports Pelvic Recovery
Pelvic dysfunction is often wrapped in secrecy and shame. Recovery benefits from small emotional practices.
Micro-Journaling Prompt (2 Minutes)
Write one sentence about how your pelvis feels today and one small win from the practice. Keep it brief and nonjudgmental.
Safety Ritual Before Practice
Light a candle or choose a scent, set a timer for 10 minutes. Create a tiny ritual to signal safety to your nervous system.
Affirmations That Ground
- “My small practices build steady change.”
- “It’s safe to request help.”
- “My body is learning trust.”
When To Seek Professional Help
Consider evaluation by a pelvic health physiotherapist if you experience:
- Persistent or worsening pain.
- Heaviness, bulging, or visible prolapse.
- New or worsening urinary or bowel problems.
- Symptoms that limit daily life or exercise.
A clinician can assess muscle tone, coordination, and offer biofeedback, manual therapy, or individualized progressions.
Common Questions And Clear Answers
What if I can’t feel my pelvic floor at all?
Many people need time to relearn awareness. Begin with diaphragmatic breathing, light cues (e.g., imagine stopping flow of urine), and work with a clinician for biofeedback if needed.
Will these exercises make a prolapse worse?
Gentle, coordinated pelvic floor work is usually protective. Avoid heavy bearing-down movements and seek professional advice if you have an existing prolapse.
How long before I see improvement?
Small changes often appear within 4–8 weeks of consistent practice. Functional improvements can continue for months. Consistency wins.
Can I do these exercises during pregnancy?
Generally, yes, but consult your provider. Focus on breath and gentle coordination rather than forceful squeezes, especially in late pregnancy.
Is kegeling enough?
Kegels are a tool, but not the whole toolbox. Fast taps, holds, eccentric control, and functional integration are essential for real-world stability.
Do I need to stop exercising while retraining?
Not usually. Modify high-impact activities if they provoke leakage or pain, and integrate pelvic support cues into workouts.
FAQs — Short Helpful Answers
How often should I train?
Daily micro-practice with 3 focused sessions per week is a good starting point.
Should I use weights or devices?
Some people benefit from vaginal weights or biofeedback under clinician guidance. Avoid unsupervised internal devices if you are unsure.
Can men use these exercises?
Absolutely. Pelvic floor stabilization benefits anyone with pelvic muscles — post-prostate surgery, incontinence, or core instability.
What about pain during sex?
Pain during intercourse needs careful assessment. Pause exercises that increase pain and consult a pelvic health specialist.
Sample 10-Minute Routine (All Levels Friendly)
Begin with two minutes of diaphragmatic breathing and the grounding script. Move through:
- Pelvic Floor Awareness Breath ×10
- Quick Taps ×15
- Heel Slides With Breath ×10 each side
- Bridge With Integration ×10
- Eccentric Release Drills ×6
- Cool-down breathing ×2 minutes
This routine can be repeated or shortened to fit pockets of time.
Realistic Goals To Set
Month 1: Establish daily micro-practice, feel less guarding.
Month 3: Improve quick-tap responsiveness and comfort during light activity.
Month 6: Functional carryover to lifting, walking, and exercise with fewer symptoms.
Celebrate small wins: fewer protective behaviors, more comfortable laughter, or a successful short jog.
Troubleshooting Template To Use With Your Clinician
When talking to a pelvic health professional, bring this short script:
- Brief symptom summary (one sentence).
- What I tried (daily micro-practice, quick taps, bridges).
- What made it better/worse (e.g., coughing provokes leakage).
- My goals (e.g., return to running without pads).
This focused info helps clinicians create efficient plans.
Final Reassurance
Healing pelvic function is not a race. It is a series of tiny, trustworthy steps. When the work is consistent and patient, the body responds. The aim is not to chase an ideal of perfection, but to cultivate reliable safety in movement — to stand up without bracing, to laugh without calculation, to carry groceries without fear.
You are doing a brave, practical thing by choosing steady, kind practices. Keep the breath soft, the lifts small, and the days consistent. The quiet work you do now becomes the resilient body you live in later.
Further Resources And Where To Look
- Seek a specialized pelvic health physiotherapist for hands-on care and biofeedback.
- Look for reputable organizations or local clinics that focus on pelvic health.
- Consider trusted books or guidance from credentialed pelvic health professionals.
Final Micro-Checklist To Take With You
- Breathe first.
- Begin with awareness.
- Do quick taps and holds daily.
- Integrate support into functional tasks.
- Progress slowly and seek help if pain or new symptoms arise.
You are not broken. You are learning a new language of movement — one that honors tenderness, steadiness, and practical progress. Keep going; small, steady practice rewires the body’s sense of safety.