
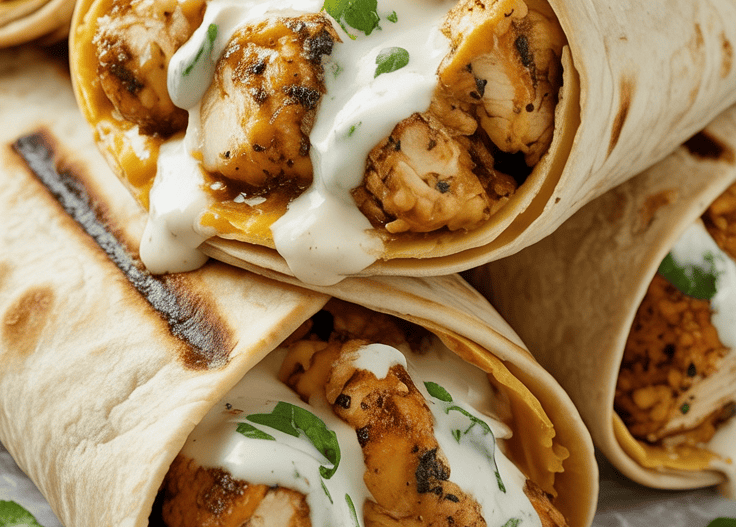
Get ready to transform your weeknight dinner game with these Cheesy Garlic Chicken Wraps. I’m always chasing that perfect balance of convenience, flavor, and that irresistible cheese pull—and this recipe delivers on all fronts.
Tender, garlicky chicken meets two kinds of melting cheese, hugged by a warm tortilla and finished with a quick toast to golden perfection.
In under 30 minutes, you’ll have a crowd‑pleasing meal that’s equally welcome at the dinner table, a make‑ahead lunch, or a game‑day spread. Plus, with easy swaps and prep‑ahead options, you’ll wonder how you ever lived without them.

Why You’ll Love These Wraps
- Speed & Simplicity
One‑pan chicken cooking and easy assembly mean dinner on the table in under 30 minutes. No complicated steps or fancy equipment required—just your skillet and spatula. - Bold, Balanced Flavor
A blend of garlic powder and fresh garlic, smoky paprika, and perfectly seasoned chicken gives you maximum taste impact. Then we amp it up with sharp cheddar and stretchy mozzarella for that dreamy cheese pull. - Customizable & Versatile
Craving a little heat? Swap in pepper jack. Want more veggies? Toss in sautéed bell peppers or fresh spinach. These wraps adapt beautifully to your pantry and preferences. - Great for Any Occasion
Whether you’re feeding hungry kids, meal‑prepping for the week, or hosting friends for a casual gathering, these wraps hit the spot every time.
Ingredients
| Ingredient | Quantity | Notes |
|---|---|---|
| Cooked chicken breast, shredded | 2 cups | Rotisserie chicken works brilliantly as a time‑saver. |
| Olive oil | 1 tbsp | For coating and cooking the chicken. |
| Garlic powder | 2 tsp | For seasoning. Can substitute with 2 cloves of fresh garlic. |
| Onion powder | 1 tsp | Adds depth and subtle sweetness. |
| Paprika | 1 tsp | Smoked for extra complexity, or sweet for a milder note. |
| Salt & black pepper | To taste | Essential—season generously to taste. |
| Shredded cheddar cheese | 1 cup | Sharp cheddar gives a tangy punch. |
| Shredded mozzarella cheese | ½ cup | Melts beautifully for that stretchy cheese pull. |
| Large flour tortillas | 4 | 8-inch or burrito‑size; warm before rolling. |
| Creamy garlic sauce or aioli | ½ cup | Homemade or store‑bought—see the homemade version below. |
| Fresh parsley, chopped (optional) | 2 Tbsp | Bright garnish to finish. |
Equipment
- Non‑stick skillet or grill pan – ensures even cooking and easy cleanup.
- Spatula – for flipping the chicken and wraps.
- Mixing bowls – one for chicken seasoning, one for sauce.
- Measuring cups & spoons – precision counts!
- Knife & cutting board – to chop parsley and any optional add‑ins.
Prep & Cook: Step by Step
1. Season & Cook the Chicken
- Toss the chicken: In a medium bowl, combine shredded chicken, olive oil, garlic powder, onion powder, paprika, salt, and pepper. Mix well so every strand of chicken is evenly coated.
- Heat your skillet: Place your skillet over medium heat. If it’s a bare pan, add a teaspoon of olive oil.
- Sauté the chicken: Add seasoned chicken to the skillet. Cook, stirring occasionally, for 6–8 minutes, until chicken is heated through and the edges begin to crisp lightly. Transfer to a plate and keep warm.
Chef’s Tip: If using raw chicken breasts, dice into bite‑sized pieces and cook over medium‑high heat for 8–10 minutes, ensuring no pink remains. Rest before shredding for maximum juiciness.
2. Warm Tortillas & Prep Garlic Sauce
- Warm tortillas: Stack tortillas and microwave for 20 seconds, or briefly heat each in a dry pan for 10 seconds per side. This makes them pliable and prevents tearing.
- Make quick garlic aioli (if homemade):
- In a small bowl, whisk together ¼ cup mayonnaise, 1 tsp minced fresh garlic, 1 tsp lemon juice, and a pinch of salt.
- Taste and adjust garlic or lemon to your liking. Store‑bought garlic aioli works perfectly here, too.
3. Assemble Your Wraps
- Spread sauce: Lay each warm tortilla flat. Evenly distribute about 2 Tbsp of garlic sauce over the center of each.
- Layer chicken: Divide the cooked chicken among the tortillas, arranging it in a line down the middle.
- Add cheese: Sprinkle ¼ cup cheddar and 2 Tbsp mozzarella over the chicken. The combination of cheeses ensures both flavor punch and that irresistible melt.
Chef’s Tip: For extra flavor, brush the inside of each tortilla with a thin layer of melted garlic butter before adding fillings.
4. Roll & Toast to Perfection
- Fold & roll: Fold the two sides of each tortilla inward, then roll from the bottom up to enclose the filling completely.
- Toast wraps: Return your skillet to medium heat (no oil needed if using a non‑stick pan). Place wraps seam‑side down and cook 2–3 minutes per side, pressing gently with a spatula, until the tortillas are golden brown and the cheese is melted.
- Garnish & serve: Transfer wraps to a cutting board. Slice diagonally and sprinkle with chopped parsley for a pop of color.

Variations & Chef’s Tweaks
- Spicy Kick: Swap cheddar for pepper jack or add a few dashes of hot sauce to the garlic aioli.
- Veggie Boost: Sauté sliced bell peppers and onions with the chicken, or stuff in fresh spinach leaves right before rolling.
- Bacon Lovers: Stir in crumbled cooked bacon or place bacon strips over the chicken before adding cheese.
- Health‑Conscious: Use whole‑wheat tortillas, low‑fat cheese, and Greek yogurt in place of mayo for the sauce.
- Herb Infusion: Mix chopped cilantro or basil into the chicken for a bright, fresh note.
Serving Suggestions
- On the side: Sweet potato fries, classic potato chips, or a crisp garden salad with vinaigrette.
- Dip it up: Extra garlic aioli, salsa verde, or a cool ranch dressing.
- Party platter: Cut wraps into bite‑sized pinwheels for easy snacking at casual gatherings.
Make‑Ahead & Storage
- Prep ahead: Cook and season the chicken up to two days in advance; keep refrigerated.
- Assemble later: Fill and roll wraps, then wrap individually in plastic wrap. Store in the fridge for up to 24 hours; toast right before eating.
- Freeze option: Place un‑toasted wraps on a baking sheet, freeze until firm, then transfer to a freezer bag. Reheat in a 200°F oven for 15–20 minutes or until warmed through.
Nutrition & Yield
- Yield: 4 generous wraps
- Prep Time: 10 minutes
- Cook Time: 15 minutes
-
Total Time: 25 minutes
| Metric | Per Wrap Estimate |
|---|---|
| Calories | ~450 kcal |
| Protein | 28 g |
| Carbohydrates | 35 g |
| Fat | 22 g |
| Fiber | 2 g |
| Sodium | 650 mg |
(Nutrition varies based on exact ingredients and brands used.)
FAQs
Can I use rotisserie chicken instead of cooking chicken from scratch?
Absolutely! Shredded rotisserie chicken is a fantastic shortcut. Just toss it with the seasonings in Step 1, then heat briefly in the skillet until warmed through.
How do I prevent my wraps from falling apart?
Don’t overfill—aim for no more than ½ cup of filling per tortilla. Fold the sides in snugly before rolling up, and always toast the seam‑side down first to seal.
What’s the best way to reheat these wraps?
For a crisp exterior, reheat in a skillet over medium heat for 2 minutes per side. You can also pop them in a 350°F oven for 10 minutes or microwave for 60 seconds (though you’ll lose some crispness).
My cheese isn’t melting—what went wrong?
Make sure your skillet is hot enough before adding the wraps. Medium heat gives the cheese time to melt without burning the tortilla. If needed, cover the skillet for the first minute to trap heat.
Can I make these gluten‑free or dairy‑free?
Yes! Use gluten‑free tortillas and swap dairy cheeses for plant‑based shredded alternatives. For the sauce, choose a vegan mayo or dairy‑free yogurt and add extra garlic and lemon for punch.
There you have it: a straightforward, flavor‑packed recipe for Cheesy Garlic Chicken Wraps that’s as adaptable as it is delicious.
With simple ingredients, easy prep, and chef‑insider tips, you’ll be wrapping, toasting, and indulging in the ultimate comfort handheld meal in no time. Enjoy!
