
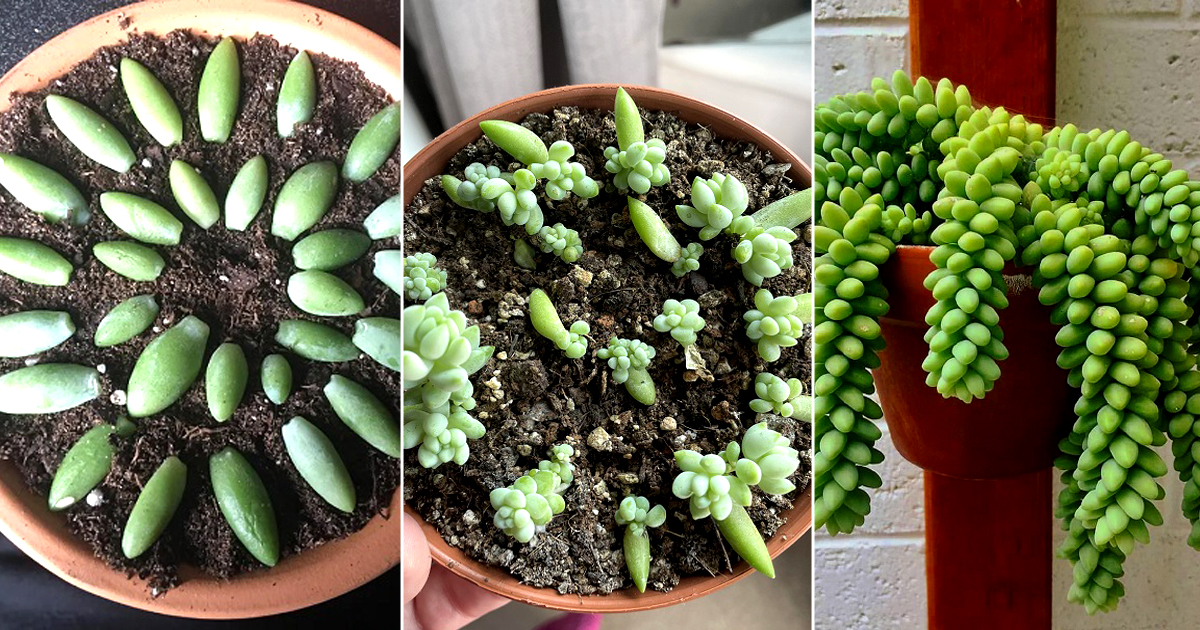
Learn how to grow Burro’s Tail from leaves with simple steps and get a thriving, cascading succulent for your home!

Burro’s Tail (Sedum morganianum) is a trailing succulent with thick, bead-like leaves that easily fall off, even with gentle handling. Instead of viewing this as a drawback, you can turn every dropped leaf into an opportunity to propagate and grow new plants. Let’s see how!
Best Time to Propagate Burro’s Tail From Leaves

Burro’s Tail is generous year-round, but summer and early fall are hands-down the best seasons to propagate.
The warm temperature and longer days will provide you with just the right conditions for leaves to sprout roots and tiny plantlets quickly.
You can still propagate in the cooler months, but the process is slow. If you live in a mild climate (USDA zones 9–11), you can propagate outdoors during spring and fall, but protect leaves from heavy rain, cold drafts, or sudden temperature dips.
Note: Never attempt propagation during peak winter unless you’re doing it indoors with warm and bright conditions. Burro’s Tail leaves sulk in cold weather, and it can take forever to root.
How to Grow Burro’s Tail From Leaves
1. Collect Healthy Leaves

The first step is all about choosing your leaves wisely. Gently pluck or twist off healthy leaves from a mature Burro’s Tail stem. Make sure these are firm and full, rather than shriveled or bruised. Also, the leaf should come off clean with its base intact; otherwise, it won’t root.
Once you have gathered a handful, inspect them for damage or tears. Place the healthy ones on a paper towel in a dry and shaded spot. Burro’s Tail leaves are extra juicy, so they need 3–5 days to callus at the cut ends.
If you live in a humid region, shorten the drying time slightly to avoid shriveling, but ensure the cut end feels dry to the touch before proceeding.
2. Prepare the Soil

Burro’s Tail loves light, airy, and well-draining soil. A good mix is equal parts cactus soil, perlite, and pumice. The goal is to create a medium that dries quickly and keeps excess moisture away from the roots. You can also mix in a small amount of coarse sand to improve drainage further and prevent the soil from compacting over time.
Next is to choose a shallow tray or a wide container to lay your leaves on. Unlike jade plant leaves, which can root while sitting upright, Burro’s Tail leaves prefer lying flat with their callused ends just touching the soil surface. Don’t bury them as they need air contact to spark new growth.
3. Rooting the Leaves

Here’s where the magic happens, but for that, patience is key! After you have arranged your leaves on the soil, don’t mist the surface right away but wait for 4-7 days for light misting.
Burro’s Tail hates excess water, so mist very lightly every 5-7 days, to keep it “barely moist” rather than “damp.” You will see roots forming in 2–4 weeks if conditions are warm.
Soon after this, you’ll notice tiny bead-like pups in 4-8 weeks emerging from the leaf base; these are your baby Burro’s Tails beginning their slow growth. Keep the tray in bright, indirect light, as direct sunlight can scorch the delicate leaves.
If you notice leaves becoming soft or translucent, it’s a sign of too much water or insufficient airflow, so reduce misting and increase ventilation immediately.
4. Transplanting the Babies

Once your leaf cuttings sprout roots and new growth, it is time to move them to their own pots.
You should pick small containers with excellent drainage and use the same well-draining succulent mix. Carefully lift the tiny plants with a spoon or chopstick, as their roots are incredibly delicate.
Then, plant them shallowly, giving each one a bit of room to spread. Later on, transplant them into slightly bigger pots, and the new pups will start trailing down the pot’s edge, while giving you the signature “burro’s tail” look. It grows slowly, so don’t expect instant cascades.
Pro Tip: It’s best not to water immediately after transplanting. Let the soil settle and give the roots a few days to adjust before the first light watering. This reduces the risk of rot and encourages stronger establishment.
5. Caring for Your Young Burro’s Tail

New plants need a slightly different care routine than mature ones. For the first few weeks, water sparingly and water only when the soil is quite dry. You can then gradually introduce them to more sunlight, which is filtered until they are strong enough to handle brighter conditions.
Once mature, Burro’s Tail is one of the easiest succulents to care for. It prefers being slightly neglected, so resist the urge to overwater frequently.
During the growing season (spring and summer), you can feed your plants with a diluted cactus or succulent liquid fertilizer every 4–6 weeks to boost growth.
Also, avoid feeding in winter, as the plant naturally slows down. With patience and minimal fuss, you’ll eventually have a dense, trailing succulent that enhances any space with its unique texture and form.
Propagating Burro’s Tail takes patience, but the results are worth the wait. With the right technique, even a single leaf can become the start of a gorgeous trailing succulent. So what are you waiting for?


